Since I decided not to continue with Project Life for this year, I finally had the chance to play with Heidi Swapp’s Memory Planner. I wanted to try her planner last year when she came out with her new system, but I had already decided to do Project Life and to keep two different albums documenting the same bits of my life just seemed a bit redundant, so I passed on Heidi’s planner. But I never did complete my 2015 Project Life album as the system just didn’t do anything for me anymore. So this year, I have decided to try Heidi’s planner and with the her new planner range out, I was able to order a bunch of her embellishments to accompany the planner I picked up at Hobby Lobby.
Now, her planners come in a rather big, Project Life styled binder that I didn’t really like. For storage of extra pages and such, it’s great, but for me to carry around would just be too much. Even though I haven’t had to carry my planner anywhere–and don’t really plan to do so anytime soon–I still didn’t want anything to bulky. So I order myself my very first Marion Smith A5 planner to put Heidi’s inserts into. Now, I ordered my MS planner way before I bought my HS planner, but I just thought the pink and gold hearts of my MS planner just paired so well with Heidi’s inserts that I just had to put that planner into my MS. So when I got both of them together, I carefully paired the two together, punching extra holes into my Heidi Swapp inserts to fit the three-ring binder (HS planner comes in a four-ring binder). The whole of the HS planner almost line up with your typical A5 planner rings, but I still had to add the extra two holes on either end and repunch a few of the holes already there to make them a little bigger, so that the fit was better. I did all of the inserts without a problem.


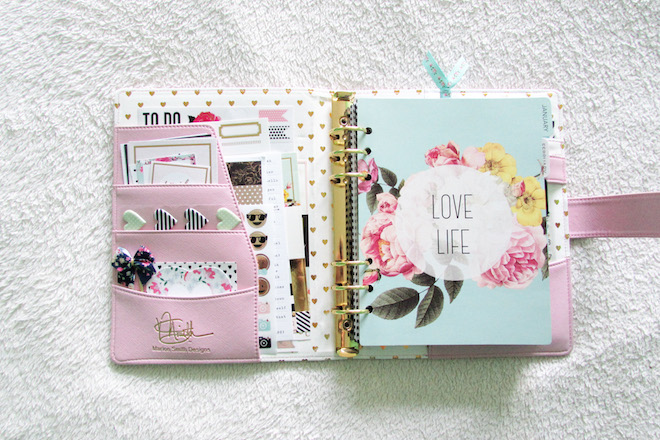
To complete my setup, I just added a bunch of matching embellishments from Heidi’s line into the front and back pockets of my Marion Smith planner. In the front I have lots of stickers and labels tucked into the big secretarial pocket. In the smaller pockets I keep a few 4×4 and 2×2 matching cards, some heart puffy stickers, and a few sheets of sticky notes from The Planner Society kits I get that I though match so well with everything. I also keep a spare paperclip handing there as well, if I need to mark a page or section off.


When I first started filling in the month of January, I didn’t know what to use the first page of the planner for. Just to give you some background, the planner is broken into months, each month begins with its own divider and subsequent page (not pictured) is a monthly dashboard of sorts, with different boxes for To Do lists and such. As of now, I still don’t know what to used that page for, as I’m not using my planner for practical day-to-day things, but more like a journal, documenting what’s already happened. This also made deciding what to use the monthly view a challenge as well. In the end, I did my best at decorating it and jotting down one main thing that happened each day in the tiny box. I played around a bit with my handwriting and tried to keep everything as neat as I could. All in all, I think my monthly spread came out well.


The heart of the planner are the weekly pages. For the first week, since the month of January began on a Friday, I covered the page with some scrapbook paper and made a little intro of sorts, with a picture of myself and my 2016 intentions listed underneath. On the other side, I began documenting January, using photos and embellishments, jotting down the main thing that happened each day in the space provided.
I believe Heidi’s whole concept with this planner is to jot down one little things each day for an entire year, because even those little moments are worth just as much as the bigger moments that you may make minibooks out of. I fell that even though this is similar to Project Life, it’s a bit simpler for me as I just need to jot down one thing each day and I have the freedom to do whatever I want in terms of visuals and not be confined to a small pocket. Some of my pages are simple, where as others I did a bit more decorating.
I did a bit of catch-up with the month of January, but now that I’m all caught up to February, I will try to get into the habit of filling in each day then sitting down on Sundays to do all of the decorating for the week, that was if I have photos I want to include, I have all of them ready while I decorate my spread. Right now, I’m really enjoying fill out my Memory Planner and I hope to have a stuffed planner by the end of the year to look back on!
Melissa Rodgers
Hello,
I loved your post! I’m new to planning and it has been very inspiring. I love your plan with me videos. I just had a quick question, I have the heiddi swapp memory planner and would love to put the inserts into my new webster pages (6 ring binder). What did you use to add the extra hole, a 6 hole punch or a single? (I have neither so going to buy one). Melissa x
Tiffany Julia
Melissa RodgersHi Melissa! Thank you. I used a single hole punch to punch the extra holes into my inserts. I did the dividers separately from the inserts and started doing them one at a time, just to get the alignment right before doing the inserts in four-page bunches. You will also have to repunch a few of the existing holes just to make the a tad bigger so that the pages all turn smoothly.