
I’ve been slowly getting deep into the planner world and the vast community on Instagram and Facebook. Planners are everywhere now, so much so that when the trend started out, planner nerds used scrapbooking materials to sort of “micro-scrap” in their planners. But now, scrapbooking companies are making their own planners! I don’t own many planners. I only have two: an A5 mint Kikki K and a Personal–or medium–sized Lilac and Gold Kikki K. But of course, I’m itching to get a few more.
Recently, I’ve stumbled across the amazing ways you can use a Midori Traveller’s Notebook. I’ve heard of the Midori a while back–I think even before I got into binder-style planners–but it never caught on with me. They’re really just a piece of leather with a bunch of elastic strings that hold small kraft notebooks. It’s a very simple notebook and I never really saw myself using one. But recently, I came across them again on Christy Tomlinson’s new planner Instgram. She posted this lovely photo of a bunch of Midori’s that she made out of fabric using a tutorial on Youtube. She mentions two separate videos, so extremely curious now–because her FauxDori’s are beautiful–I went to Youtube to look up those videos.
The first video is from The Reset Girl. It’s about an hour video explaining what a Midori Traveller’s Notebook is, showing all the different options for getting a notebook cover and inserts, where to get these covers, inserts and accessories, and explaining way in which you can go about using the notebook. It’s such a great video. It’s so in depth and explains everything. I really felt like I knew enough about the Midori after watching her video that I went onto the second video, which is the DIY tutorial of how to make your own Midori.
This video is from Sea Lemon. She shows us a very simple and easy way to make a Midori. She gives a list of materials you’ll need to make the notebook and most of it you can find in any craft store like Michaels and Joanns.
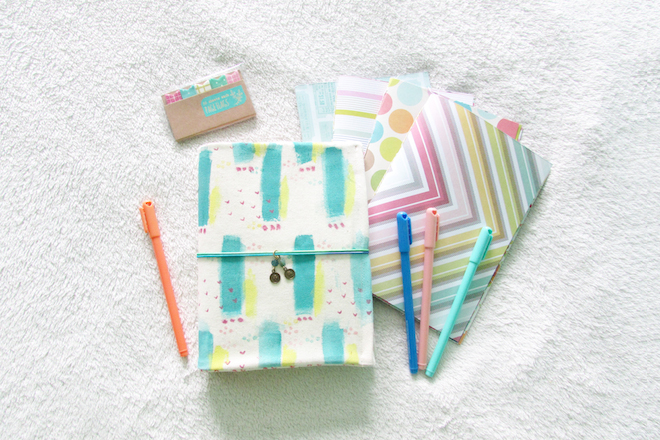
I made my FauxDori’s a little differently. If you remember, I make these really neat junk journals from fabric and paper scraps that I use as travel journals. I made a bunch of them. I have a few for sale then two I made for myself to use on upcoming trips. But recently I realized that my next trip to Southeast Asia will be much too long to document in just one of my junk journals. Realistically, I’d need to bring two of them with me (each notebook has two notebook signatures in them, totaling four notebooks), and as a traveller who likes to pack lightly, I just couldn’t justify carrying two of those notebooks with me.
Enter the Midori. I figured I’d try it out for a bit and see if it makes more sense to bring a Midori with me instead of my regular junk journal. With the Midori, I can just pack an extra notebook insert and add it to my Midori notebook when I need too. And since Midori’s are a bit expensive, I figured that I could just make my own. Now, I didn’t want a leather Midori. I’m not too fond of leather notebooks. Generally it’s very hard to find colorful leather and since I didn’t have leather on hand, I decided to make my Midori from fabric. I used canvas for mine which I purchased at Michaels, and since I have all of these colorful fabric swatches that I use for my junk journals, I decided to combine the two ideas and make a junk journal FauxDori. I basically assembled my cover the same way I do my junk journal covers, except I changed the dimensions to reflect that of a Midori-styled notebook. Once I had my cover done, all I had to do was gather some scrapbook and graph paper, and made my inserts–these little saddle-stitched notebooks–that I can easily slip in and out of my Midori. I added a little charm I made on my elastic band and my notebook was done!

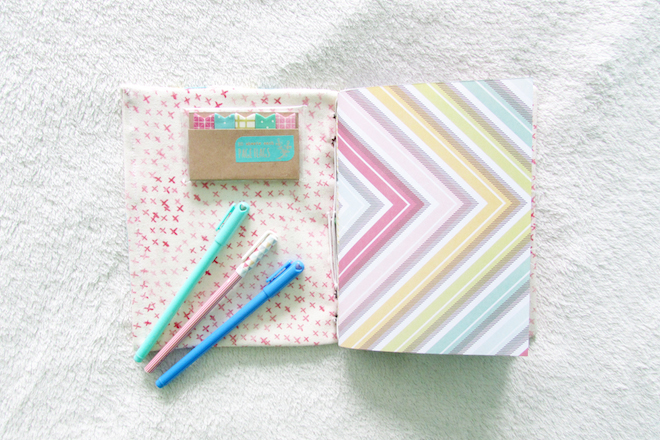
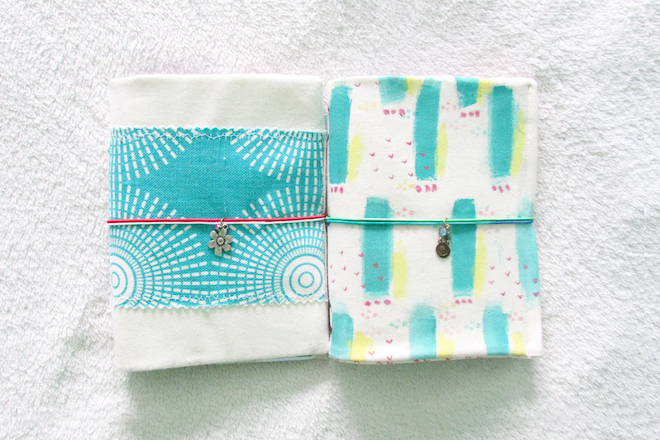
I only made two covers so far and tons of notebook inserts to put into them. My first cover (the teal one) was a bit sloppy only because I had no idea what I was doing, and my second was just a little better, but I feel like the more I make them, the better they will be. With the second cover, I hand painted and stamped the colorful pattern straight onto the canvas, which added a bit more time to the process. Honestly, making yourself a FauxDori is probably the easiest and most cost effective way to owning your own Midori Traveller’s Notebook. It’s probably the only planner notebook out there that you can easily DIY at home and really make it unique to you. I think that’s what ultimately appealed to me, the fact that I have full control on customization, from my handmade cover to all the inserts that are so simple to stitch up. So, if you’re looking to try out a Midori and are cool with a fun DIY project, I definitely suggest making your own FauxDori and try it out for yourself!
Comments (13)
Fab
March 6, 2015 at 10:48 am
Great choice of colors for the covers, they’re very beautiful :)
Tiffany Julia
March 6, 2015 at 1:54 pm
Thank you! :)
april
March 11, 2015 at 10:26 pm
This is April’s daughter. I’ve never heard of Midori’s before until my mom was watching this and recommended it to me since I write. After watching your video, I want to use one. It’s…there’s no word to describe its awesomeness.
Tiffany Julia
March 14, 2015 at 11:49 pm
Hey! Do give it a try if you can. I love how you can customize it any way you want and use it for all sorts of things. I think that’s why they’re so easy to DIY. I actually have a writer friend who’s committed to her Midori, so definitely give it a go! :)
Dawn F.
March 29, 2015 at 6:28 pm
I am obsessed this weekend in looking at any and all diy fabric midoris! Yours are beautiful! I can’t tell though, are your edges raw or did you stitch and turn the cover right side out? I’m thinking of stitching with raw edges out and lining with either stiff interfacing or a thin batting. Just to give some structure. Thanks for posting!
Tiffany Julia
March 29, 2015 at 6:46 pm
Hi Dawn! Thank you for looking! On my first try, the one with the teal fabric, only the side edge of the back flap is raw. I sewed the cover in reverse like you would make a pillow, turned it inside out, then put a thick sheet of drawing paper in it to act as a stiffener. Then I sewed up the remaining opening side raw. The second one I did the same thing, except I folded the opening edges inward on themselves, then stitched to give it a finished look. I actually like the more finished look on these. I’m actually thinking of restitching the first one to make it look neater. Have fun making yours! They are quite addicting to make once you’ve finished the first, just FYI :)
Monica
April 5, 2015 at 9:12 pm
Thanks a lot for sharing! Like you, I’m going from place to place on the internet (and youtube and pinterest) to learn as much as possible about the traveler notebooks. Especially on how to make them. So thank you! :) Your blogpost was very helpful.
xx Monica
Isabel
April 7, 2015 at 5:46 am
Hi, this is such an awesome DIY and I’m going to try this soon. BTW how did you string the elastic through the spine of the fabric? or did you stitch the elastic unto the spine in order to add all the cute filler notebooks?
thanks!!
Tiffany Julia
April 7, 2015 at 4:45 pm
Hi Isabel. I basically followed the Sea Lemon video I mentioned above when it came to stringing the elastic strings. After I sewed my fabric cover, I then made the holes in the spine like she does in the video and capped them with round metal eyelets, so that it made it easier to string the elastic strings through. If you’re going to use leather or vinyl, you can poke the holes and leave them as is, and string the elastic like she does in the video, but since I used canvas that frays when you make the holes in it, I found adding the eyelets was best. I hope this explanation helps! :)
Shaunta
June 25, 2015 at 11:00 am
Hi! Did you find a home for your misfit? I’d looove to give it a home.
Tiffany Julia
June 25, 2015 at 4:49 pm
Which misfit?
Mahjong
July 10, 2015 at 10:22 pm
When I originally commented I clicked the “Notify me when new comments are added” checkbox
and now each time a comment is added I get four emails with the same comment.
Is there any way you can remove people from that service?
Bless you!
Tiffany Julia
July 10, 2015 at 11:25 pm
WordPress doesn’t let me even see the email addresses of those who are subscribe to post comments, so there’s no way for me to remove you. I would think there should be an unsubscribe link in the emails themselves for you to remove yourself from receiving new comments on this post?